You know, Easter eggs get all the glory this time of year. But what about Easter cookies? These delightfully decadent treats always seem to get overlooked in favor of their decidedly less delicious, boiled, vinegar-dyed, eggy counterpart.
Shocking, we know. It’s time Easter cookies stepped into that glorious spotlight.
If you’re simply looking for a happy belly, you might be able to snag one of our Easter Egg Carton packs from your local grocer. If you want to, say, gift some of our Easter cookies, look for our individually wrapped Easter Bunny and Easter Egg cookies. The individually wrapped cookies could even be a super-special treat in an Easter egg hunt! Every single one of our cookies is decorated by hand and with love right here in Seattle, WA.
While our cookies are always an excellent choice, you might be looking for something a little more creative in nature, something more akin to decorating Easter eggs. If that’s the case, whipping up some homemade shortbread and decorating it might be just what you need. And it’s something the whole family can enjoy doing together.
Whip Up Some Shortbread Cookies
There are lots of shortbread recipes out there, from those that use only the three traditional ingredients (flour, butter, sugar) to those that get a little fancier in flavoring. Use the shortbread recipe in this blog, whip up your favorite recipe, or find one online that sounds tasty—the choice is yours!
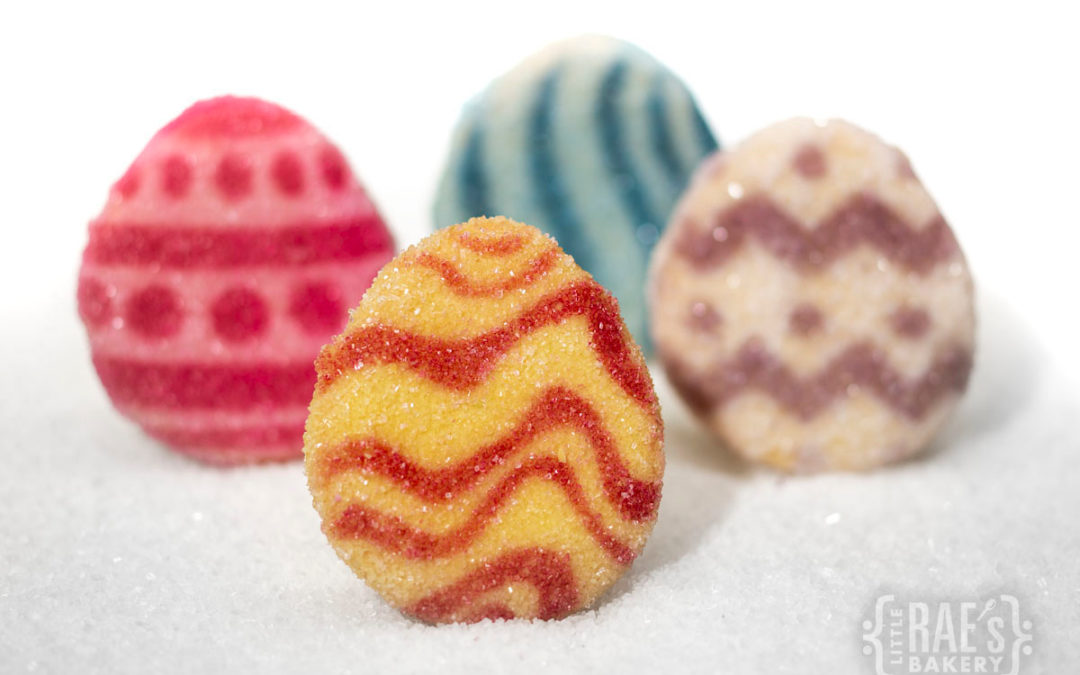
We recommend cutting your Easter shortbread cookies into some fun shapes related to the holiday or springtime in general:
- Egg
- Bunny
- Flower
- Butterfly
- Chick
- Cross
- Palm Leaf
- Lamb
Depending on the shortbread recipe you use, the dough may be a little delicate or crumbly, which can make cutting intricate shapes more difficult. If you are having trouble with your dough, try chilling it for 30 minutes in the fridge (covered) or using a simpler cookie shape.
Decorate Your Easter Cookies – A Family Event!
Shortbread cookies usually look quite plain without decoration – making them the perfect canvas for your creativity! Here are some decoration methods you could use to create a bakeoff-worthy final product.
Simply Sprinkles
If you want cookies that are just a little fancy but that don’t take too much work, the Simply Sprinkles method is for you. There are a few options for how to enact this method, but both are easy, with gorgeous results. The main thing to keep in mind with all these options is that you will need to apply the sprinkles before baking. They will not stick to the cookies after baking without some form of adhesive, like frosting or glaze.
Option 1: Sprinkle & Pat
This works best for simple shapes, like the egg. Simply cover the surface of your cut cookies in your sprinkles of choice, then pat them in gently with your hand. Be careful as you do this not to ruin your carefully-cut shape. After your sprinkles are secure, bake as directed.
Option 2: Mix It Up!
For more detailed shapes, try mixing the sprinkles into the dough itself, before cutting out your shapes. You can also add a few sprinkles on top and gently pat them in – but be extra careful not to distort your designs!
Option 3: Roll, Baby, Roll
If you aren’t planning on using cookie cutters, this is a fun option. Start by pouring your sprinkles into a shallow dish. As you are dividing your dough into individual cookies, form them into balls and roll them around in the sprinkles dish. Squish the cookie balls into disks and place on the baking sheet. Don’t be shy! The idea here is to cram as many sprinkles onto the surface of your cookie as you can. The result is a bright, beautifully decorated Easter cookie straight out of the oven. This option is foolproof, and it’s one the kids can easily help with, too.
Still sound like too much work? Here’s an even simpler way to get a similar effect. Roll your shortbread dough (all of it) into a log about 2 inches in diameter. Wrap the log in plastic and place it in the fridge to chill for 30 minutes to an hour. Once the dough is chilled, pull the log out of the fridge and cover the outside in sprinkles, patting them in to ensure they stick. Once you have packed as many sprinkles onto the outside of the log as you can, carefully cut it into discs about half an inch thick (or as thick as your recipe has specified). You’ll end up with shortbread that’s plain on top but fancy as heck on the rim.
Frosting, Paint, and Sprinkles, Oh My!
For those that want to get a bit more creative, this style is for you! It starts with the right frosting for the job. If you want a frosting that will set/dry, go for a buttercream. If frosting manipulation isn’t important to you, a cream cheese or store-bought variety will do—just keep in mind that these don’t set as well and tend to be messier. If you want to try some more intricate methods, royal icing will be the ticket. Here are some decoration methods, in order from easiest to most difficult (in our opinion).
Option 1: Frost (& Sprinkle)
If you just want to apply a layer of frosting and be done, this option is for you. Try jazzing your frosting up by making it fun colors (gel food coloring works best for bright colors). You can even make food-based dyes out of things like beet juice. Once you have your frosting ready, simply apply it to the top of your fully-cooled cookies… and voila! If you want to get extra fancy, try swirling two colors of frosting together on top of the cookie or add some sprinkles.
A note here… do not apply frosting if the cookies are warm. At all. Seriously, wait for them to cool! Otherwise, you’ll end up with a melty, melty mess. Delicious, but not so pretty.
Option 2: Paint Me Like One of Your Easter Eggs, Jack
Here’s a fun option for those of you who want to get a little more artsy. Make or purchase some edible food paints and use that to literally paint your cookies (use food-safe brushes that you haven’t used for anything else, of course). The options here are endless! From watercolors to splatter designs to highly detailed cookie art, this can make for a fun art project for everyone.
If you want a smooth surface to paint on, you’ll first want to whip up some royal icing and flood it across your cookie’s surface (info on how to do this here). Once the icing is dry, you can paint your designs right on top of it.
You can also paint straight onto the cookie itself, though keep in mind that you’ll go through a lot more food dye this way, as the cookie will absorb it. The resulting design will also not be as precise, but if you’re going for a messier watercolor or tie-dye effect, that might be exactly what you wanted!
Option 3: Icing Master
If you want to try your hand at intricate frosting designs for your Easter cookies, royal icing will be your absolute best friend. Use your preferred method here. Some ideas:
- Outline and flood the cookie with one color, let dry, and then add detail (as here)
- Dip your cookies in one color of icing, then use thin lines/dots and feathering to add a fun pop of color (as here)
- Use layering and fine detail to bring your cookies to life (as here)
So, what’ll it be? Another year of egg-dyeing, or a new tradition of making something that not only looks good, but tastes good, too? (We know which one we’d choose…) If you are choosing to decorate Easter cookies this year, we’d love to hear which style you’re planning to go for – Simply Sprinkles, or Frosting, Paint, and Sprinkles, Oh My!?